OK, here goes. As promised, after receiving a ton of questions about shooting the milky way, I'm going to try to outline how to get a decent shot without buying a 25,000$ telescope! This is a bit lengthy, but there's really no way to say it in 500 words or less. Even so, please bear in mind that I'm keeping this as simple and basic as possible. I'm certainly no expert, and serious astrophotography is a very technical field, and I'm only barely scratching the surface to get you started. If you get hooked, you can do further research on your own!
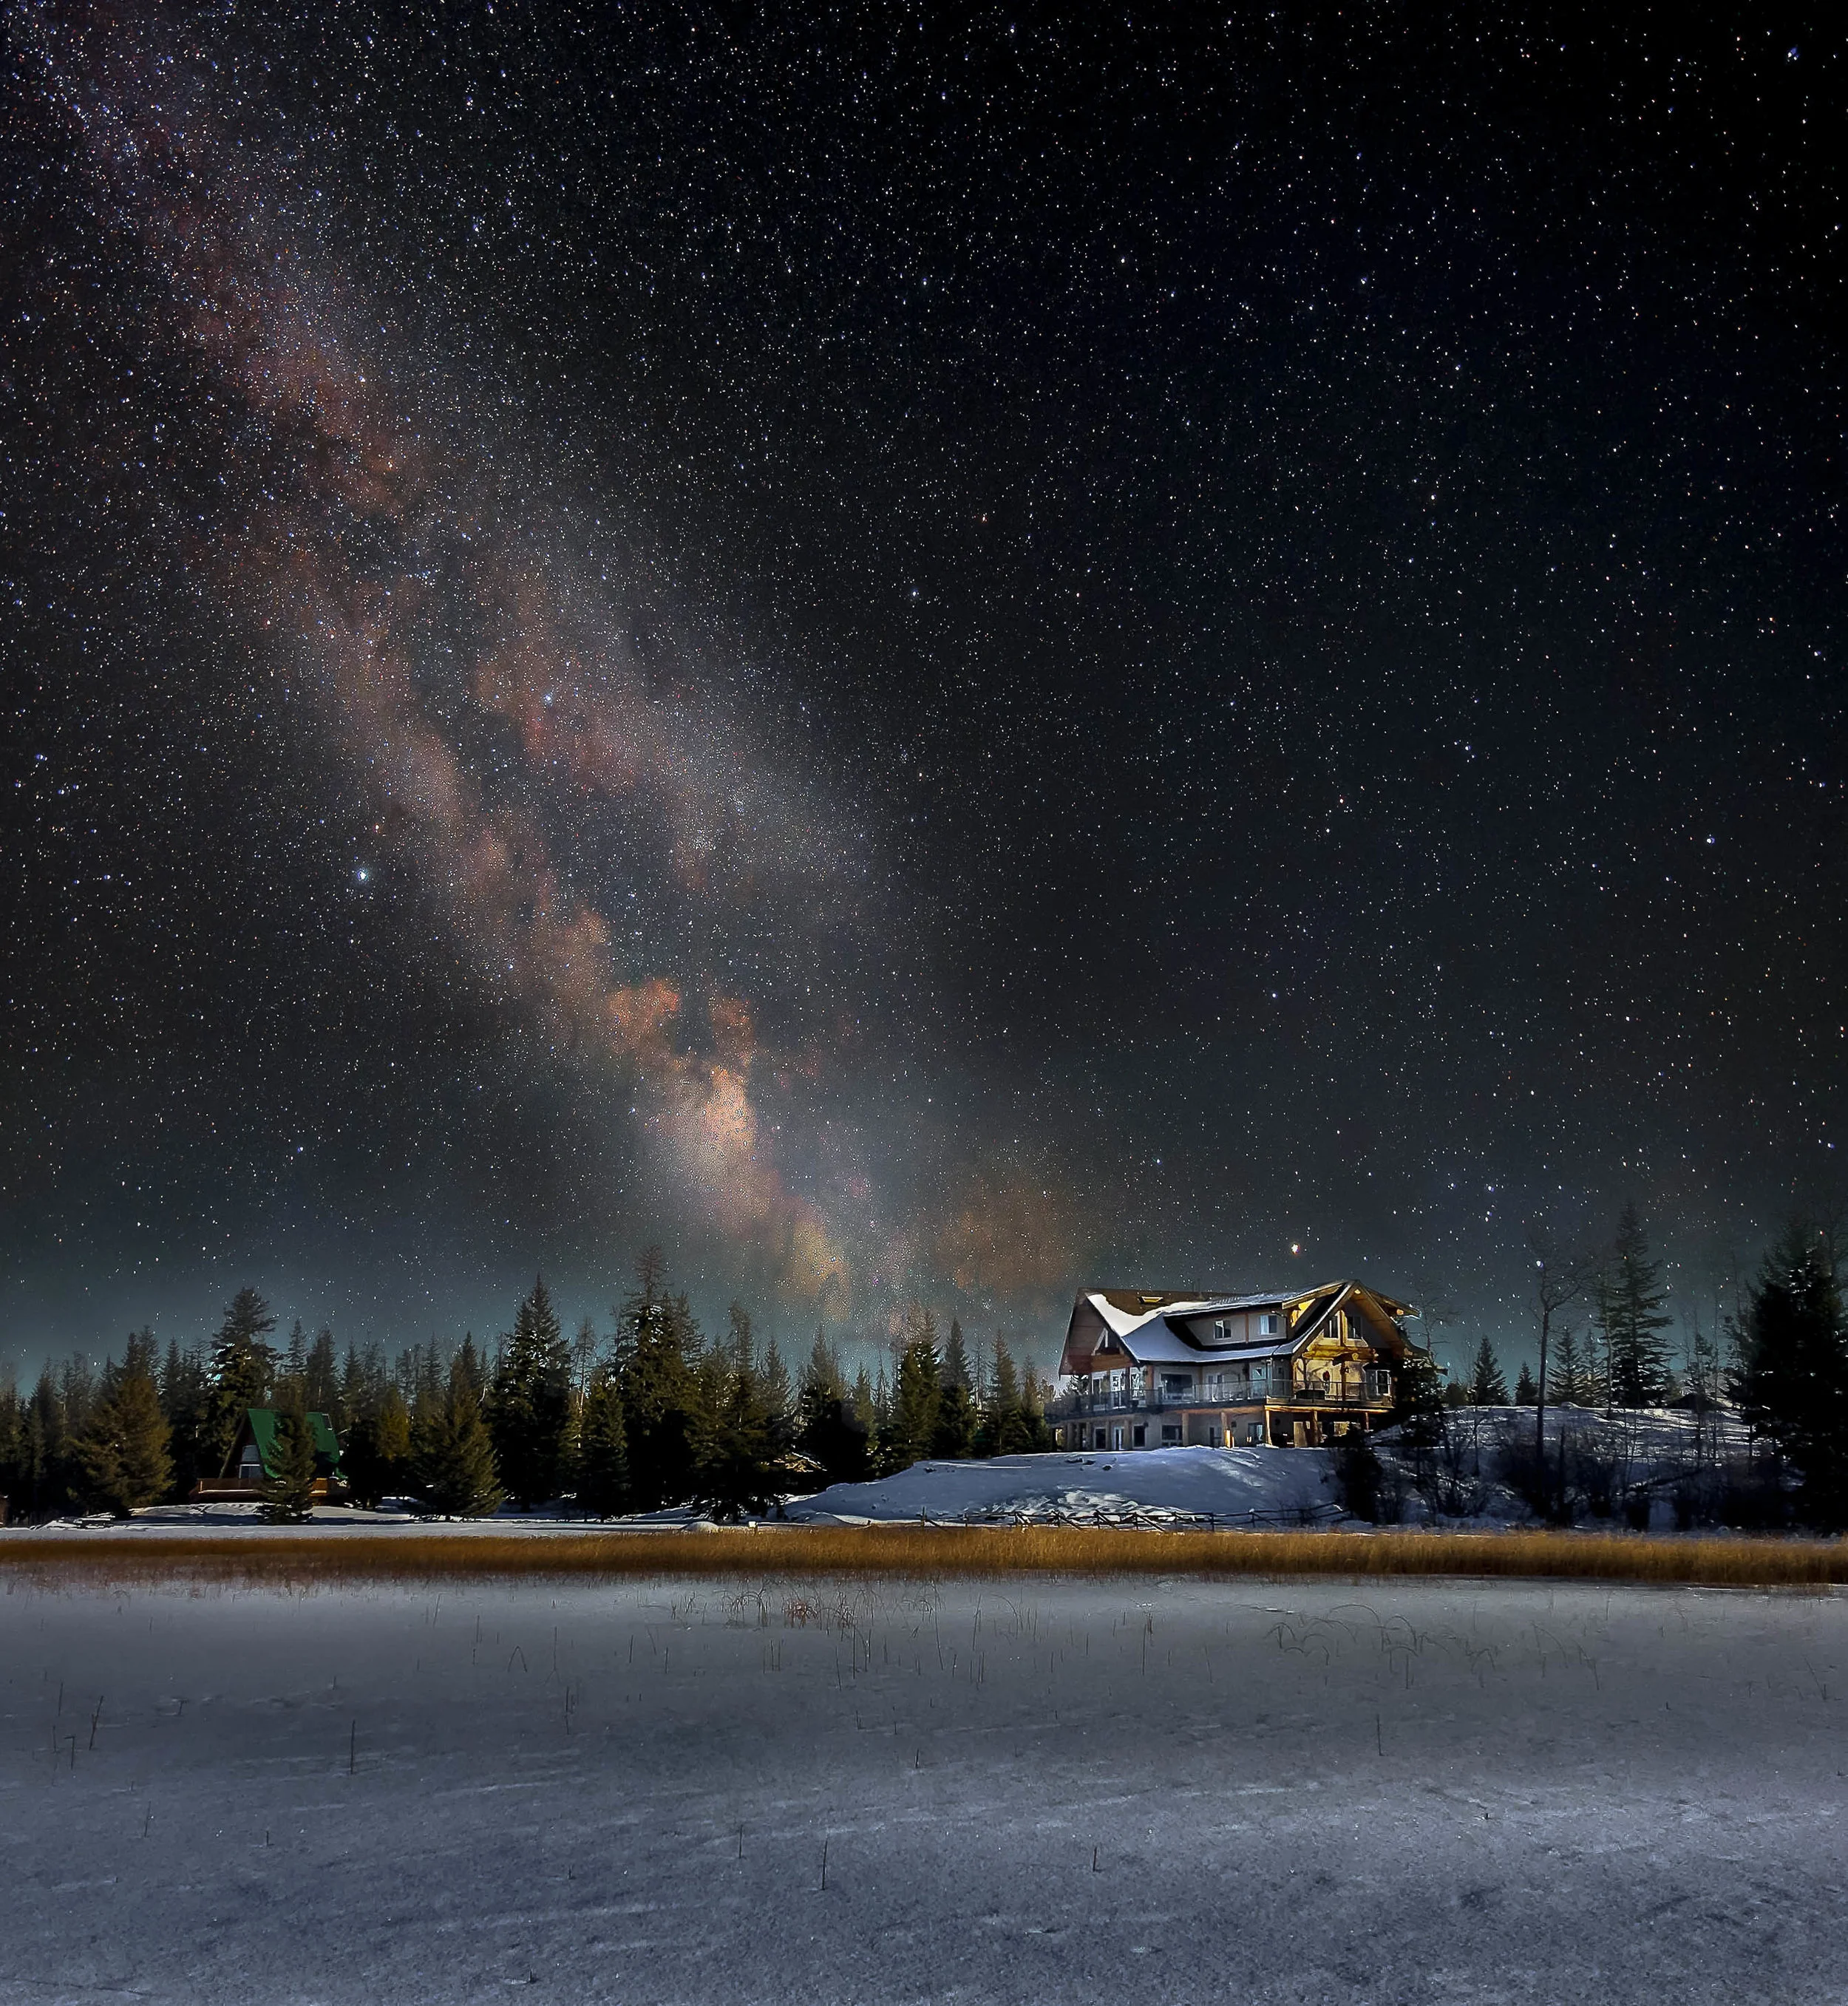
This one made Editors’ Favourite, June 8, 2017 on National Geographic Your Shot.
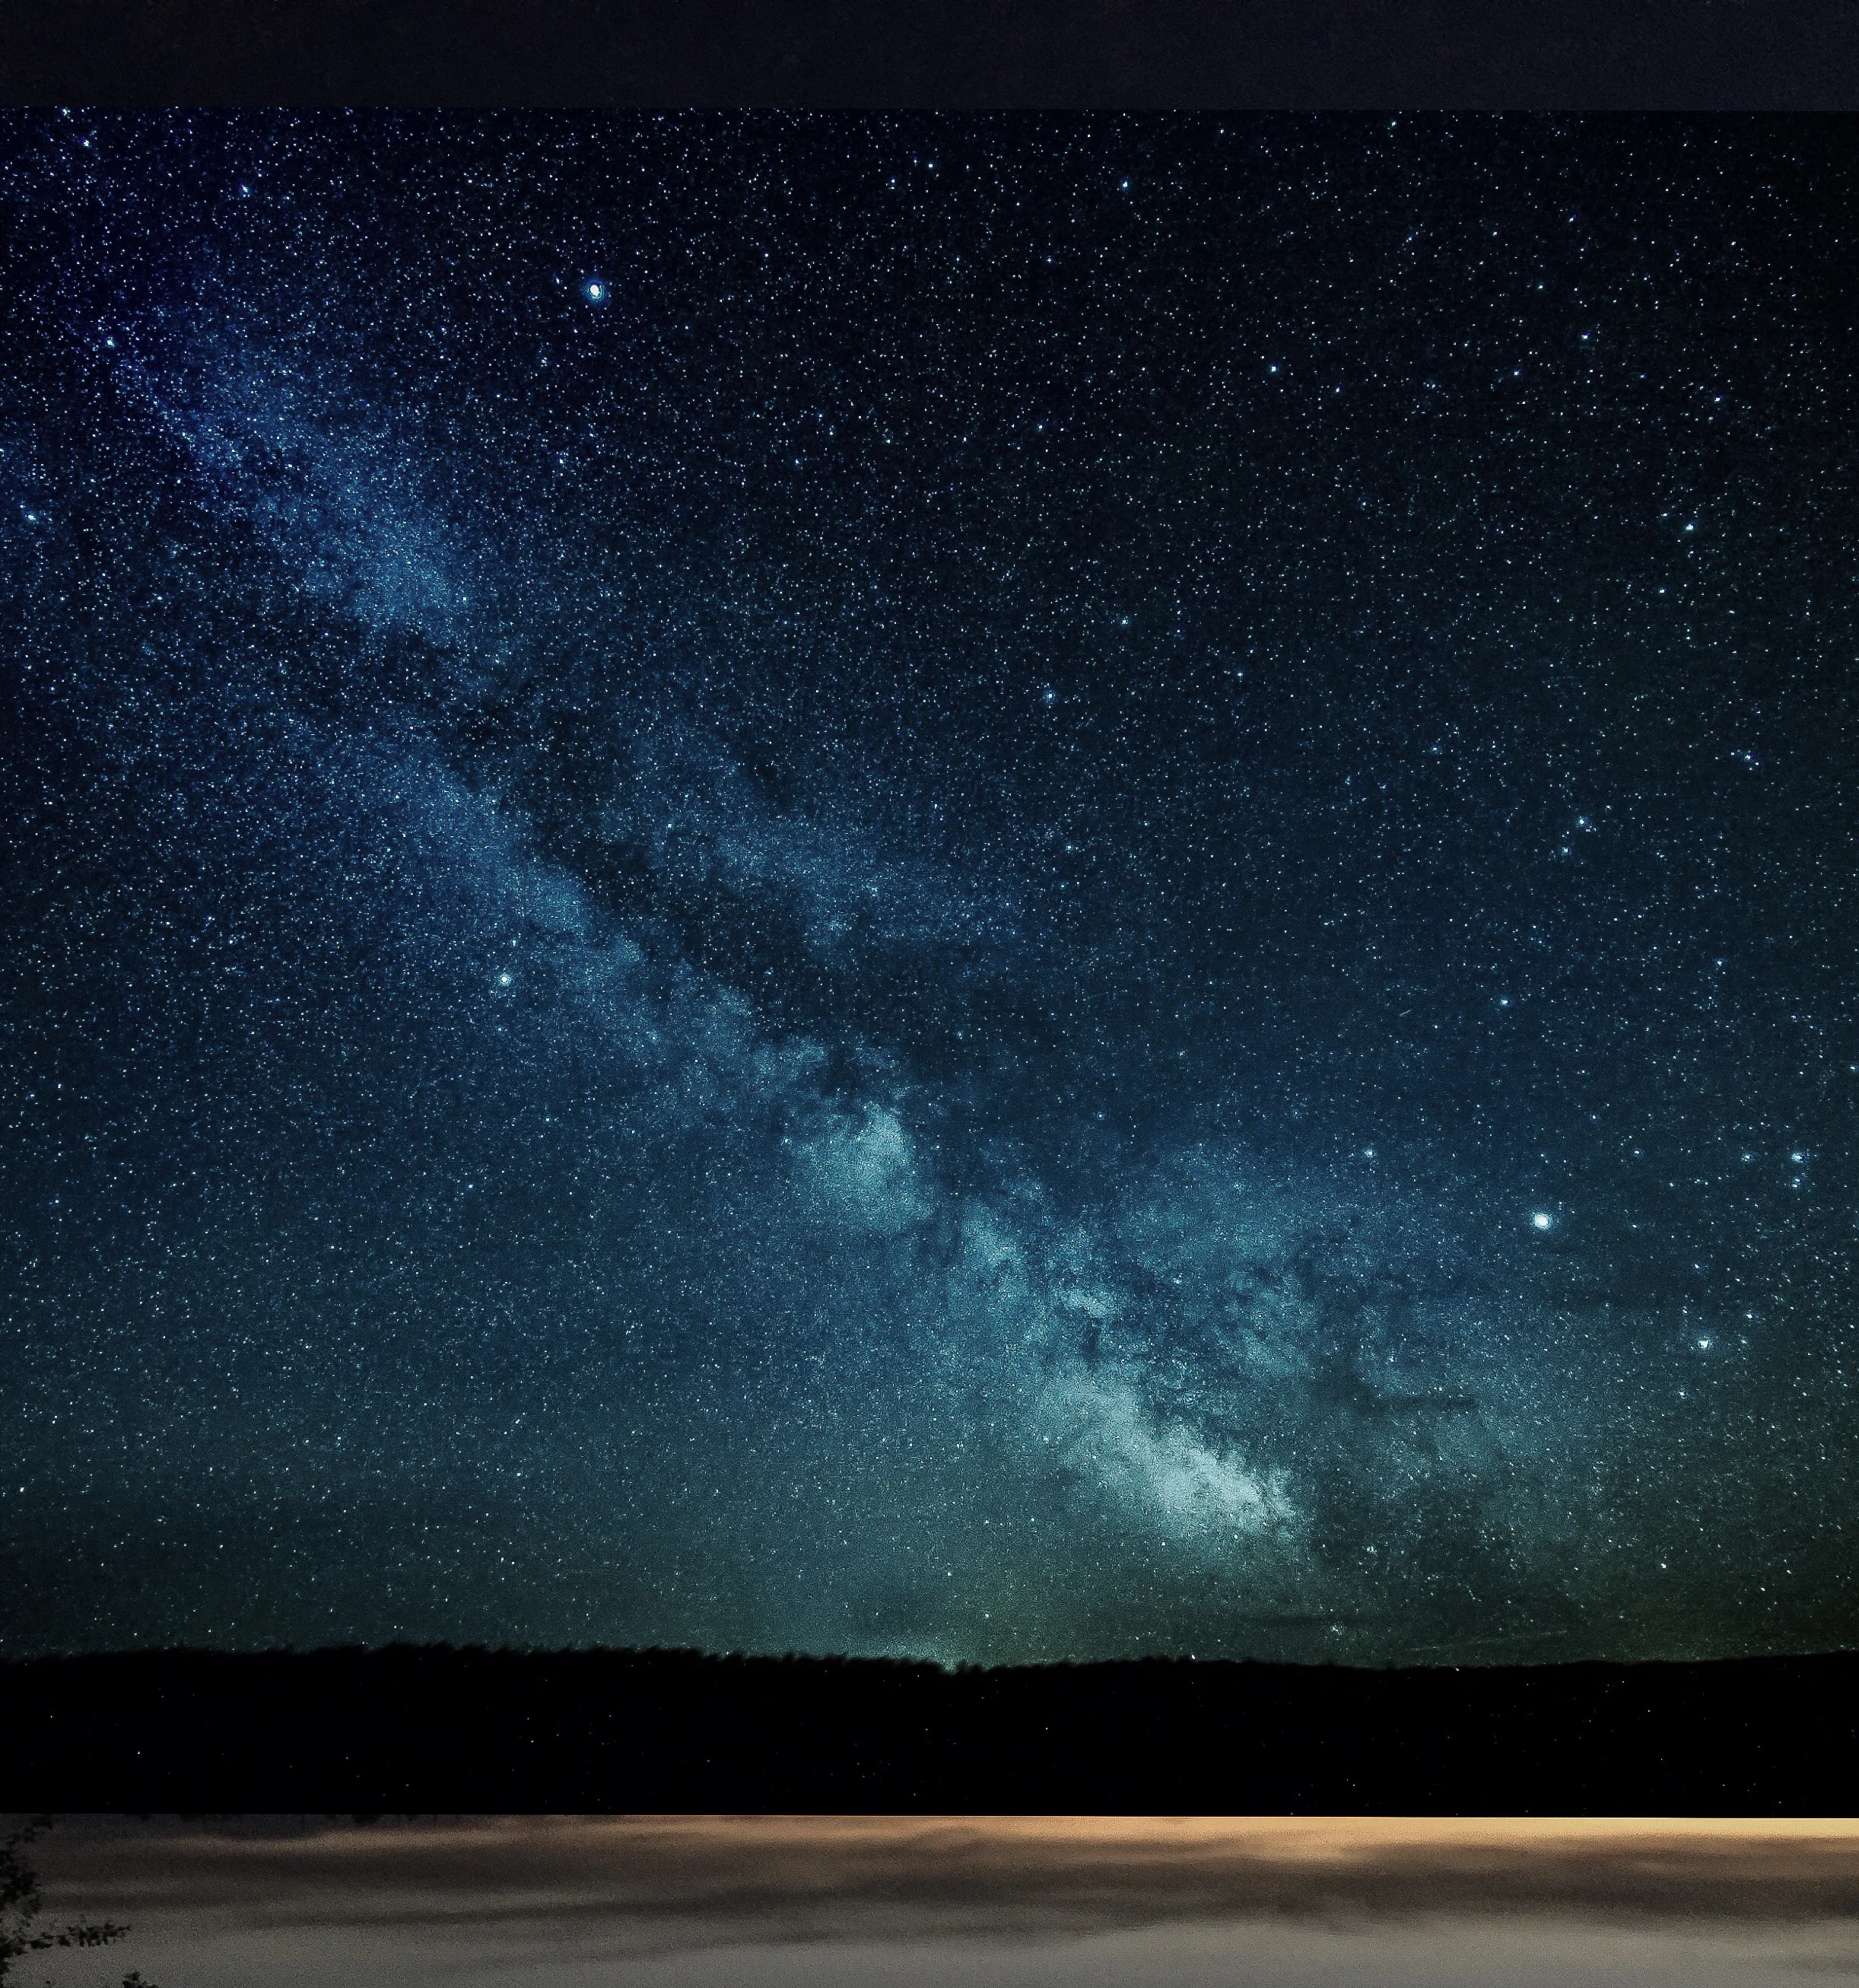
This was my first try. Lots of room for improvement! First lesson; pre-focus in the daylight! lol
Background:
For me, this astrophotography thing got started partly because I finally caved in to the digital age. Having very deep roots in film, going back over 40 years, I was trying use a modern digital camera body, and yet stick to my old ways of producing images mostly "SOOC". (Straight Out Of Camera).... Basically, look for the light, envision the shot, manipulate the camera, focus, frame, and shoot. And then wait for the results to come back from the lab, unless you had your own darkroom. The best thing about digital, I thought, was that I didn't have to wait to see the results anymore.
Eventually I came to see that I was missing out on so much more of what digital technology adds to photography. I love looking at pictures; I look at many dozens every day if I can. I learn so much just from doing that. More and more I am amazed at what is being done today. So I finally decided that it is never a bad thing to check your biases - right? Philosophical arguments aside about "photoshopping" images, I may be late to the party but I am trying to catch up a bit.
Astronomy 101:
Technically speaking, it's a misnomer to say we are photographing the milky way, since we actually live with in it. Everything we see in the sky is part of it. It's kind of like the Star Wars Force; it binds and surrounds us... LOL! For our purposes we are concentrating on photographing the Galactic Core, which is arguably the most interesting part with all the dust clouds, wispy tendrils and colourful nebulas. Which I have yet to truly capture properly. It's an ongoing project. Even just for viewing with the naked eye, you are better off with very dark skies. Here's a couple useful sites to start with:
Moon phase calendar: http://www.moonconnection.com/moon_phases_calendar.phtml
Finding dark skies: http://www.blue-marble.de/nightlights/2012
Stellarium: https://stellarium-web.org/
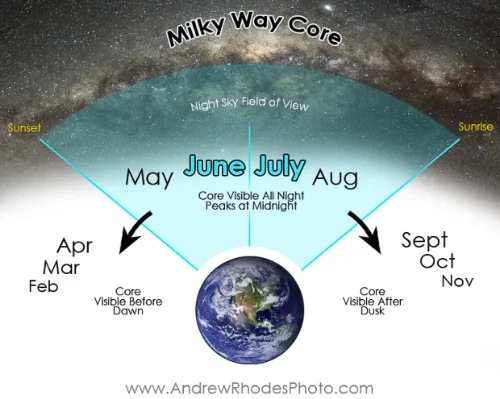
Finding the Milky Way:
In the Northern Hemisphere; look towards the southern skies to see the galactic core. It will become visible due southeast in Spring, due South in mid-summer, or Southwest in fall. We lose sight of the Core during the winter months in our Hemisphere. You'll have to do some travelling if you want to photograph it in winter. Not a bad thing!
If you are facing South, stars rotate clockwise - left to right, around Polaris, the North Star. Find the North Star, and then turn around and look the opposite way. If you are in the Southern Hemisphere, you will likely find the Milky Way Core ahead of you.
Gear up:
You can actually get some nice Milky Way shots without a lot of fancy equipment. I am assuming that you currently own a digital camera, and have some knowledge of cameras and photography in general already.
The basic requirements are:
A camera that is capable of manual mode, with a "B" shutter speed setting. If your camera has interchangeable lenses, you want to be able to set it to the widest aperture possible, (more about that later), and the "B" (bulb) setting will allow you to keep the shutter open for as long as you want. You likely need an ISO of at least 1600, and possibly more.
A good tripod. You want a good sturdy tripod to keep things still. And a cable or wireless release. If you don't have a cable or remote release, you can always use the self-timer. The main thing is that you want as little contact with the camera if possible, at the point of shutter release.
Widest and fastest lens in your bag will be the best to start with. Wide, meaning something like 28mm. 21mm and wider would be even better. This is because the milky way can span over 240 degrees in the sky - it's really hard to capture the full majesty of it without a wide angle lens. You can make do with whatever lens you have though. Just keep in mind that a narrower field of view (more magnification) will accentuate the perceived movement of the stars, and therefore may necessitate a shorter exposure to avoid making star trails in your picture. You want to achieve sharp pinpoints for stars, not orbs or lines. Fast, meaning you will want to use a lens that has a max aperture of at least 2.8 or larger. Again, the issue is about avoiding star trails. You want to capture as much light as possible in a short period of time. You can compensate somewhat by boosting your ISO way up, but that comes at the cost of more noise in the picture. It's a trade off at that point. From a technical point of view (in simple layman's terms) when you press the shutter button, power is being sent through the sensor so that the individual pixels can collect photons (light). The longer this process is going on, the hotter the receptors get, which creates distortion (noise) in the final picture. (Giant telescopes in observatories have sophisticated cooling units to address this).
Shoot in the raw. Well, you can wear whatever you want, but I mean; If your camera can capture raw files, use that. Raw files have tons more dynamic range than jpegs. You will have way more latitude to tweak everything in post processing later. Plus, if you don't like how it turned out, you don't lose the original data. You can just reset and start over! With jpeg outputs, you are relying upon the little computer in your camera to post process, and then you are very limited in what you can do afterwards. Some in-camera processors are very good these days, but can never match the power of your desktop or laptop.
Image stabilization. If your camera has image stabilization, turn it off. It works against you when you're on a tripod.
Manual focus. You want to set your lens to manual focus, because the autofocus function won't work in the pitch dark pointed up into the sky.
Optional gear:
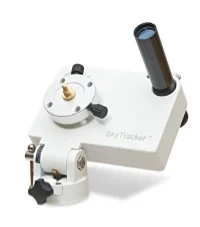
Armed with the above, you can get a pretty decent picture. But if you want to spend a few bucks, then you can start to really improve on the final results. There is a relatively cheap ($280 USD) 12mm f2.0 Rokinon brand lens on ebay that gets excellent reviews for star photography, for example. It's wide and fast. You could also invest in an equatorial mount, or, tracking mount. There are a few different ones on the market, and these units counter-act the rotation of the earth, so that you can eliminate star trails during long exposures. This means that instead of keeping exposures down to 20 seconds or so, you can go minutes, because the tracker keeps the stars in the same position on your sensor. With it you can also use "slower" lenses without the noisier signature of higher ISO.'s. It doesn't make noise go away, but it helps. I'm using an IOPTRON skytracker, (approx $400 CDN) which works very well and is easy to set up. This seemed like a cheaper option to me than buying more lenses, since the tracker can be used with all the lenses I already own.
It's a bit of an arms race after that! You can go to extremes by having the IR cut-off filter removed from your sensor, or buy a camera already set up that way. (All land-based cameras have this filter over the sensor in order to balance the kind of light we see in the daytime, for normal picture taking. But a lot of the light we receive from space is in the IR range, so we miss out on a lot.) That reminds me, don't forget to remove your skylight or UV filters before shooting the stars. I'll just stop there. Suffice to say that you can go as far as you want if your bank account is happy enough. The whole point is that you can do this with your basic gear. Everything else is icing on the cake.
Pre-Planning:
Checklist:
Camera & Lenses
Tripod and release cable
Perform all camera settings beforehand
Smart phone with Stellarium app
Remove any skylight/UV filters
Flashlight with a red lens (so you don't ruin your night vision)
Extra batteries for everything
Extra memory cards
Notebook
Bug spray in some areas!
So now you have your gear assembled. Assuming you have a night with clear skies, the next thing you need is a good location to view the Milky Way! First and most important, is to get as far away from the city lights as you can. Light pollution will wash out most of the stars. During long exposures, even a little glow which seems dim to our eyes, will be a huge problem in your photos. Next, pick a near-moonless night. You can check the internet for moon phases; you want the New Moon cycle, which will be the darkest skies. There are all kinds of phone apps to help with this. Also, check out Stellarium, which is an invaluable smart phone tool for planning where the Milky Way will be in real time or at a certain time/date in the future.
I like a location that is fairly high, and has wide open spaces, but that's all up to you. Your foreground can be "painted" with a flashlight, or you can add a separate image later in photoshop, like I did. (The Milky Way doesn't actually rise over Green Lake in the place I show it below.) One (of many) mistake I made was leaving most of my set up till I got on location. It's really tricky to get critical focus in the pitch black, and many lenses go a little past "infinity", so you can't just rack the lens out to the max and have things in focus. Now I do that during the day on some distant mountains, and then tape the barrel so it doesn't move. Make all your camera settings ahead of time too. Fumbling around with tiny buttons in the dark really sucks.
If your camera has a Noise Reduction mode, use it. Writing the image to disk takes a little longer, but you'll get a cleaner capture. If you have a Live View mode, use it. You can watch the image build on the screen, which is way cool.
The Shot:
Set up your tripod and camera so you are looking south. Once it is dark, try a test exposure of 30 seconds, ISO 1600, f 2.8, with your widest angle lens. If your lens is slower than 2.8, you may need to boost your ISO a little more. Check your test image for star trails, focus, composition, levelling etc. and make any adjustments.
There's something called the "rule of 500", whereby you divide the focal length of your lens into 500, and the result is an approximate exposure value to start with - (example, 24mm lens divided into 500 = 20.8 seconds) but I have found that it is more of a guideline than a rule, since many people have different crop factor sensors, etc in their cameras and the formula doesn't take this into account. Still, it is a place to start. You'll have to experiment a bit to find the best exposure for your particular setup, but that's half the fun!

A not-so-good iphone pic of my setup on location. Dam it's dark out! I'm using a tracker mount, but you don't need one to get some great shots.
For the pics in this blog I was using an Olympus OMD EM-5 on the Ioptron skytracker mount. I have other cameras, but this one seemed to handle noise a little better, plus it has live-view, which allows me to watch the image build on the rear screen at preset intervals. Of course, I'm handicapping myself right from the start, because I'm using Micro four/thirds format... If you have a larger sensor you may achieve better, cleaner images than me.
*edited to note, as of 2018 I've added a full-frame sensor camera back into the inventory.
Good Luck and have fun!